Tuesday, 14 May 2013

Iberico Restaurant Review


All Images © www.ibericotapas.com


I have been to Iberico tapas a few times now, and I cannot recommend it enough! In the heart of Lace Market, it is easy to miss but it is somewhere that is definitely worth seeking out.  Situated in a beautiful grade II listed building, the restaurant has a wonderful relaxed atmosphere with a simple but welcoming interior.

The key to great Mediterranean food is simplicity and putting together good ingredients that taste and look great. Iberico boasts all the dishes commonly associated with Spanish cuisine such as; Potatas Bravas and Gambas a la plancha. However, differing from traditional tapas, Iberico uses a vast range of ingredients and international influences, elevating simple tapas into elegant and exciting dishes.

If you are vegetarian there is a great range of dishes including Goats cheese stuffed Piquillo Peppers with Spinach, Honey and Hazelnuts and Chestnut Cavallo Nero. Any good Spanish menu worth its weight always has a beautiful paella dish on its menu and Iberico’s certainly doesn’t fail to deliver. For fish lovers I would also recommend the Hake with Green Olive and Lemon Salsa as well as the Scallop with butternut, orange and chorizo jam.  However, my favourite dishes have to be the slow cooked lamb rump with spiced aubergine, yoghurt and 
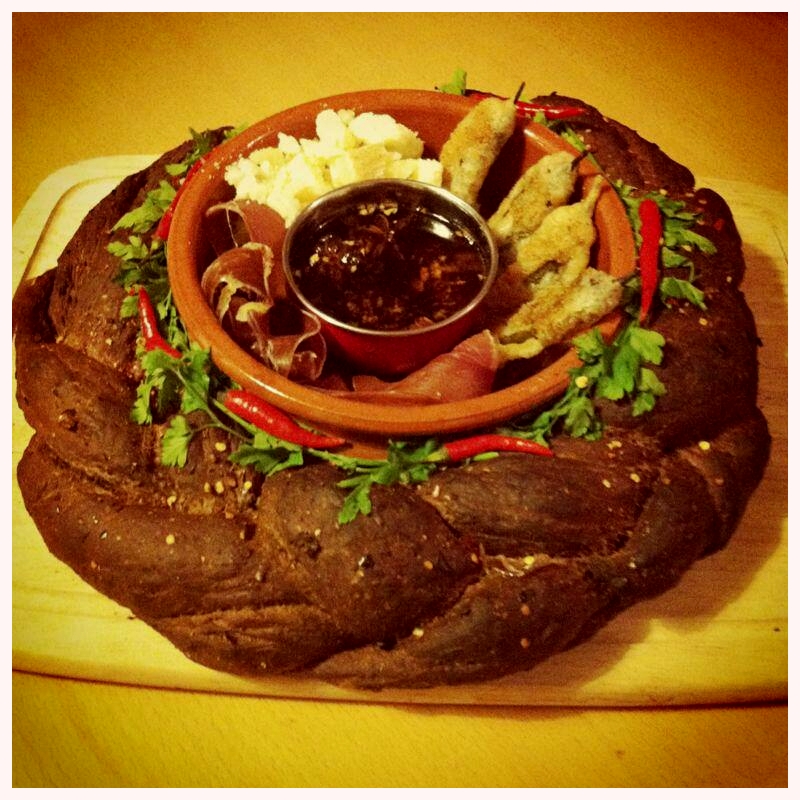
mint and the crispy pork belly with celeriac and rhubarb.  Iberico also offers amazing charcuterie and cheese boards with a range of delicious homemade breads. If you are able to manage a desert the churros with chocolate sauce are the perfect way to finish your meal!

The price range of each of these dishes is from £5-£7 but if this seems a little pricey there is an express lunch offer between 12pm and 2pm, Monday to Friday for £11.95. For this you get, Catalan bread, 2 tapas dishes and dessert. The portions of each dish are a good size and you easily get your moneys worth in the quality and quantity of the food. For those of you looking for a big hearty meal this is possibly not the place for you. This place is perfect for groups of friends looking to try something different and is a prime example of the wonderful independent restaurants Nottingham has to offer. They are open everyday apart from Sunday offering lunch service between 12pm and 2pm. They have evening service between 5.30pm and 10pm Monday to Friday and 6.00pm to 10pm on a Saturday. I would recommend booking before hand, as this place gets busy!

For more information visit Iberico’s website: http://www.ibericotapas.com/.

Tuesday, 19 March 2013

Black Chipotle Sharing Bread

This is my first post in a little while as i am approaching the end of my degree and as a result my baking has been horribly neglected. Yesterday marked another day when i was able to rid myself of a few more  essays and this has meant i was able to reward myself with the free time to make some delicious bread. At christmas i was given the Dan Lepard's 'Short and Sweet: The best of home baking', for anyone looking for a new baking book, this one comes with my highest recommendation! The recipe for Black Bread has been on my to-do-list for quite a while and i hope my take on it will inspire you to give it a go. Easter is around the corner and sadly i am not a lover of hot cross buns which seem to be the staple food of British bakes for Easter. For those of you like me who fancy something a bit different, i have used Lepard's recipe with amazing dried chipotle chilies and constructed it into something worthy of any Easter table. 

Dan Lepard has created his recipe as a loaf without any chili, however, my Black Chipotle Bread is plaited and covered with dried chili seeds and cooked around a terracotta dish. Inside i have pickled some jalepeno chilis and lightly battered them and rolled them in spicy seasoning. I have also made a chili oil and filled my terracotta dish with seranno ham and Manchego cheese. To decorate, i laid fresh corriander and parsley around my dish along with a few red fresh chilis. What i am going to show you is how to make the bread and the chili oil, you can fill your dish with anything you like, i am sure many of you will be more creative than me!

For your bread you will need:
325ml of cold water
150g Rye ( if not use a good whole meal flour, this works just as well)
2 teaspoons of fast action yeast
1 teaspoon of muscovado sugar
2 tablespoons of cocoa powder
2 tablespoons of instant coffee granules
75g black treacle
425g of strong white flour
3 teaspoons of fennel seeds
50g unsalted butter
150g grated carrot
2 teaspoons fine sea salt
1 dried chipotle chili ( i found mine from www.loveyourlarder.com)
dried chili flakes
1 terracotta dish (mine measures 11cm in width)


For your chili oil you will need:
4 Whole fresh red birdseye chilies 
1 bunch of fresh parsley
1 bunch of fresh corriander
2 cloves of garlic
250ml olive oil
3 cherry tomatoes
3 star anise 
1 smaller decorative dish

1. whisk 225ml of the cold water with 50g of rye in a saucepan and bring to the boil and then spoon into a bowl until luke warm. Then stir in your yeast and sugar and leave covered at room temperature for 45 minutes.

2. Heat the remaining 100ml of cold water with the cocoa, coffee, treacle, fennel seeds, finely chopped chipotle and butter until melted, leave until luke warm and then stir with the grated carrot and mix everything into your yeast mixture. 

3. Add to this the remaining rye, white flour and salt and stir until the mixture forms a soft sticky mass. Rub 1 tablespoon of oil onto the work surface and your hands and knead the dough, repeat this twice at 10 minute intervals.

4. Now divide your mixture into four long sausage shapes until they are all 1.5 times the circumference of your terracotta bowl, each in length. Place your terracotta bowl in the center of an oiled baking tray, plait your four pieces of dough together and place the one long plait around the outside of your terracotta bowl. Brush the top of the dough with water and sprinkle on your dried chili flakes and slip the baking tray inside a carrier bag and leave it until it is increased in size by half.

5. Now remove the plastic bag and place your baking tray into a preheated oven of 200° for 20 minutes. To get a good crust i always place a baking tray of cold water on the bottom shelf of my oven. The steam created when the water is heated always creates a good crust for your bread. After 20 minutes reduce the temperature to 180° for a further 15 minutes. Now leave your bread to cool and you can begin making your chili oil.

6. To make your chili oil chop all of your fresh ingredients finely and with the oil and star anise place into a saucepan on a medium heat for 5 minutes. By heating the ingredients it allows a greater flavour for your oil. Once taken off the heat, place in a small decorative bowl to put in the center of your terracotta dish.

7. The fun bit is deciding what you would like to put into your dish and how you would like to decorate it. Because the bread is dark and smokey in taste, i opted for spanish and mexican ingredients but i encourage you to be really creative with your dishes as this can look really beautiful and makes a great sharing dish for family and friends. 
If anyone has a go at this recipe i would love to hear from you so please send me pictures or get in touch, as you can see this went down a storm with my flat mates!


Monday, 28 January 2013

Chocolate and Toffee Marathon Cake

I recently got asked to make a cake for a charity event and was more than happy to put my baking mitts on for a good cause. Two girls are running the London marathon to raise money for PhabKids charity who promote and encourage people with and without physical disabilities to come together on equal terms.

If i was more skilled in the art of sugar paste i had ideas of grandeur and wanted to create a cake with a running track but instead created an athletes nightmare in the form of the world's most unhealthy cake. I have created a 4 layer cake with  2 x chocolate sponges and 2 x sticky toffee pudding sponges with toffee and chocolate fudge buttercream... as i said nice and light!


To make your chocolate sponges you will need:
6 eggs (seperated)
100g cocoa powder
100g melted unsalted butter
85g muscavado sugar
2-3 tbsp milk
150g melted dark chocolate (70% cocoa or more)

To make your toffee sponges:
180g stoned medjool dates
250ml of black tea
1/2 tsp baking powder
85g unsalted butter
180g Self raising flour
1/2 tsp of mixed spice
180g golden sugar
2 eggs beaten

For your Sticky Toffee Sauce ( you will need half for your butter icing):
150ml double cream
100g golden caster sugar
100g unsalted butter

Chocolate Fudge Icing:
100g dark chocolate
50g unsalted butter
200g icing sugar

Toffee Icing:
250g unsalted butter
400g icing sugar
half of your sticky toffee sauce

1. To make your Chocolate sponges seperate your eggs and to your yolks add your cocoa powder and melted dark chocolate and melted butter and put to one side. Whisk up your egg whites until light and fluffy and then slowly add your muscavado sugar until the mixture forms stiff peaks. Gently fold in your chocolate mixture into the egg whites and when folded in half your mixture and put it into two greased and lined victoria sponge tins. Place into a pre-heated oven at 160° for 30 minutes.

2. In the meantime you can make your toffee sponges. Place your dates and tea into a saucepan on a medium heat with the 1/2 tsp of baking powder for 4 minutes. In a mixing bowl cream your sugar and butter and then slowly whisk in your mixed spice flour and eggs. Finally whisk in your date mixture and half the mixture and pour each half into a greased and lined victoria sandwich tin. Bake these for 20 minutes at 160°.


3. Leave all your cakes to cool for half an hour. Once cooled make your sticky toffee sauce by melting your cream, butter and golden caster sugar together. Prick all of your sponges and pour over the toffee sauce to let the sponges absorb the sauce.


4. To make your toffee butter cream, cream together your butter and icing sugar and then whisk in the other half of your toffee sauce once it is cooled. Now layer your cake with Chocolate sponge, a layer of butter cream, toffee sponge, a layer of butter cream and repeat this with your two other sponges. On the top layer do not cover with butter cream.

5. Put this in the fridge to let the butter cream firm up. In the meantime you can make the chocolate fudge icing. Melt your chocolate and mix this into creamed butter and icing sugar. Thinly spread this over the entire cake so it is completely covered, the neater the better. 


6. You can decorate this however you wish, I chose to cover it in my favourite chocolate bars and then drizzled white chocolate over the top! This is a slightly time consuming recipe but for special occasions and worthy causes it is worth taking the time as it looks great! 


For more information on the charity Hannah and Ellie were raising money for, Phab Kids website: http://www.phabkids.co.uk/

Saturday, 26 January 2013

Sticky Pear and Ginger Muffins


If i can find any excuse to cook with Ginger i will, and this seemed like the perfect excuse. I have seen  lots of people have made ginger and pear muffins but i thought that a little sticky toffee sauce and a few tweaks could only make it more delicious! 


For your muffins you will need:
320g Golden caster sugar
320g Self Raising Flour
320g Butter
100g sour cream
3 eggs 
thumb sized peice of fresh ginger
4 small pears
1/2 tsp of Cinammon

For the Toffee Sauce:
100g Muscavado sugar
150ml Double cream

1. Cream together your eggs and sugar and slowly add your flour, eggs and sour cream to the mixture until dropping consistency ( it drops off your spoon). If  your mixture is too heavy add a little milk until you get the right consistency.

2. Now grate in your fresh ginger and mix this in with your 1/2 tsp of cinammon. Now you are ready to fill your muffin cases. Fill your cases half full as you need room to add your pear!

3. Cut your pear peices into thumb sized shapes. You can cut them however you like but i have cut mine to have a point at the top so it looks like the top of the pear. Once cut place them in the centre of your mixture pushing them down slightly.

4. Place these into a pre-heated oven of 170°  for 20-25 minutes and leave to cool for 30 minutes. In the meantime you can make your toffee sauce.

5. Place your muscavado sugar and cream into a heavy based saucepan on a medium heat to melt the sugar into the cream. Depending how gingery you would like your muffins to be, you could put another piece of ginger into your cream and sugar mixture, to infuse it with the ginger's flavour and remove once the sauce is ready. 

6. Finally prick your muffins a few times on top and pour over your toffee sauce. By pricking holes in your muffins you are allowing the sauce to seep into the sponge making it even more sticky. Do not worry about being neat they look better if they are drowned in sauce. For the purposes of my picture i used pears with stalks but i would encourage you to make your muffins without to save your teeth the trouble!


I hope you like this latest addition to my blog i would love to hear from anyone who has given this recipe a go. Happy Baking!

Tuesday, 8 January 2013

Iberico ham and Persimmon Galette


A lot of people i know have been cooking with persimmon in puddings and salads and until recently i had never even heard of it. So far on my blog, i have been indulging in sweet recipes but if i'm honest i'm much more of a savoury girl! Today i had a real hanckering for something unhealthy and delicious using my new found ingredient to garnish it. I decided to make a Galette as opposed to a pie as you can make the edges of your pastry as untidy as possibly and yet it somehow appears charmingly rustic!

For your pastry you will need:

125g Plain flour
55g salted butter
2 tbsp of dried herbs ( i used sage but rosemary would be a good alternative!)
3-4 tbsp of cold water

For your unhealthy filling you will need:

250g of Ricotta
100g of Feta
4 egg yolks
A generous handful of watercress
half a red onion
2 medium sized potatoes chopped into cubes
250g Iberico ham
1 Persimmon finely sliced ( 1mm) to Garnish

1. Firstly make your shortcrust pastry by adding your butter ( cut into cubes) to your plain flour and herbs. Work the butter into the dry ingredients until a crumbly consistency then add your cold water and work with the knife until it starts to form a dough. The less the dough is worked the better your pastry will be! Now cling film your pastry and put in the fridge for 30 minutes.

2. In the meantime boil your potatoes until soft and then cut into cubes. Dry your cubes of potato and add it to your ricotta, feta, watercress, chopped red onion, roughly torn iberico ham and egg yolks. Mix all these ingredients together  and put to one side.

3. Take your pastry from the fridge and roll it out in the circular shape until it is 0.5-1cm thick. Then place this on baking parchment and then put the baking parchment and paper on a baking tray. Put all of your galette filling in the centre of your pastry and pile it high.

4.On top of your mixture layer your persimmon with a few bits of iberico and then fold over the edges of the pastry, do not worry about being neat! With a pastry brush, brush your pastry with egg yolks to give your galette colour.

5. Pop your Galette in the oven at 175° for 40 minutes and then leave it to cool on a cooling rack. If you put it on a plate straight away your galette will have a soggy bottom! When cooled enjoy with some rocket or more water cress. This recipe is easy peasy and absolutely delicious!

Friday, 7 December 2012

Aurora Restaurant Review


Image © www.godine.co.uk


 Having heard fantastic things about Aurora I couldn’t help but be excited for my Christmas meal. The menu boasts interesting flavor combinations as well as locally sourced ingredients. Tucked away in the Lace market the building is a renovated lace warehouse dating back to the 1880’s and suggests a charming, unique setting.

  In the middle of a busy evening service, the staff managed to seat all 15 of us efficiently and were incredibly friendly. Despite the warm welcome the restaurant felt cluttered with the tables closely bunched together making a reasonably small restaurant feel even smaller. The décor also added to the cluttered look with brightly coloured cushions, shag pile rugs, artificial flowers and sparkly turquoise curtains.
 Despite the original apprehension of the interior design, as soon as my starter arrived all worries were put to rest. My homemade game terrine was beautifully presented on the plate. The terrine was accompanied by the sweet date chutney, crispy kale, textures of apple and toast. All the flavours worked together wonderfully, making sure nothing over powered the game. The rest of my party also enjoyed their starters ranging from smoked salmon and lemon oil to Grilled Pasdeloup (creeping wolf) goats cheese and beetroot salsa.
 There was a wait for the main course but this gave me time to sample the red wine which was perfectly pleasant for £15 a bottle. When my main course arrived I could not have been more pleased to see the lovely piece of pork belly sitting on my plate. Aurora cannot be faulted on its presentation of food as everything arrived looking picture perfect. The pork belly certainly rivaled my previous experiences, the meat was delightfully tender with perfectly seasoned crackling. I found myself slightly disappointed with the honeyed parsnip and ginger puree as suddenly the dish became sickly sweet. The Beef Bourguinon proved popular against the turkey with apricot stuffing which was unusually served with slithers of carrot.
 By now the restaurant was incredibly busy but there was no sense of chaos amongst the waitressing staff and we were constantly checked upon to ensure we were having a good evening. My dessert of chocolate mousse and nut caramel arrived promptly with an array of Christmas puddings, winter berry parfaits and cheese boards with fig chutney. With the words caramel and chocolate it would have been naïve of me to assume I would not get a very sweet dessert. In spite of this I did find that it was too rich and I was unable to finish it. I was surprised to taste a milk chocolate mousse as had it have been dark chocolate I would have no doubt finished it without complaints. I was also disappointed to see Cornish yarg cheese on the cheese board when Derbyshire brags some delicious local cheeses.
  In summary, I had an enjoyable evening at Aurora. Having paid £20 for an appetizing three course meal it can not be criticized for its value for money. The staff provided well executed dinner service making sure we all left happy. The waitress offered me their regular dinner a la carte menu which changes regularly costing £16 for a three course meal. I would certainly not discourage people to go and try the Christmas menu before it finishes on the 22nd of December. Aurora provides a good alternative to the dry carvery dinners so often served at Christmas. If the décor was stripped back to basics with a few candles, fresh flowers and a more subtle colour scheme it would show itself off as the charming restaurant it clearly is. It is nice to see more independent restaurants appearing in Nottingham and in support of this I would recommend a visit to Aurora.

Tuesday, 4 December 2012

Salted Caramel and Dark Chocolate Tart

This tart is ridiculously rich but perfect for something indulgent on a cold winters evening.  I had noticed that a lot of other food blogs were using salted caramel and have made an attempt of my own. hope you like it! Excuse my photography skills i promise it currently looks more much delicious sitting in front of me.

For your caramel chocolate filling you will need:

300ml of double cream ( 150ml for caramel and 150ml for chocolate)
140g of golden caster sugar
85g Golden Syrup
60g Demerara sugar
50g unsalted butter
1tsp of vanilla paste
1 tsp Fleur de sel ( if you can not find this Maldon sea salt will do) 
250g Dark chocolate ( 70% coaco or more)


For your chocolate pastry you will need:
200g plain flour
50g coaco powder
100g unsalted butter
1 egg yolk
85g icing sugar

1. Place all the dry ingredients for your pastry into a bowl along with your butter cut into small cubes. Cut the butter into flour mixture until crumbly consistency and then add your egg yolk to bind the ingredients together. 
2. Work this into the mixture with a knife until all the ingredients start to form a ball of dough. Work as little as possible onto a floured surface and the wrap in cling film and chill in the fridge for 30 minutes.
3. To make your caramel weigh out your butter and cut it into small chunks and to it add your vanilla paste and set to one side.
4. Then to deep saucepan add the cream, both demerara sugar and caster sugar, golden syrup and double cream. Put on a medium heat for a few minutes and then put on a slightly higher heat and then cook until bubbling and continue to cook for 8 minutes. after a minute or two stir in your butter until the mixture is smooth. Then immediately take off the heat and set to one side. 
5. Boil your cream and then add to it your chocolate and let the chocolate melt into the cream off the heat. When the ingredients are all mixed in and glossy mix into your caramel and leave to the side.
6. Take your pastry out of the fridge and roll out to about 1-2cm thick and line your tart tin. Mine is 24cm in diameter. Blind bake for 15-20 minutes at 200°.
7.  After it has been taken out of the oven leave to cool for half an hour and then add to it your chocolate caramel mixture. Leave to set at room temperature as i have found if you leave it to chill in the fridge it looses its shine and we want it to look glossy and inviting!
There we have it! Do not underestimate this tart it is very very rich but nothing a sweet tooth can't handle.